Media
[vc_row equal_height=”yes” content_placement=”top” css=”.vc_custom_1481476949915{margin-bottom: 5vh !important;}”][vc_column offset=”vc_col-lg-8 vc_col-md-8″][woodmart_image img_align=”center” click_action=”lightbox” woodmart_css_id=”62722ec487134″ img_id=”7151″ display_inline=”no” parallax_scroll=”no” responsive_spacing=”eyJwYXJhbV90eXBlIjoid29vZG1hcnRfcmVzcG9uc2l2ZV9zcGFjaW5nIiwic2VsZWN0b3JfaWQiOiI2MjcyMmVjNDg3MTM0Iiwic2hvcnRjb2RlIjoid29vZG1hcnRfaW1hZ2UiLCJkYXRhIjp7InRhYmxldCI6e30sIm1vYmlsZSI6e319fQ==” woodmart_box_shadow=”no” wd_hide_on_desktop=”no” wd_hide_on_tablet=”no” wd_hide_on_mobile=”no” img_size=”full”]

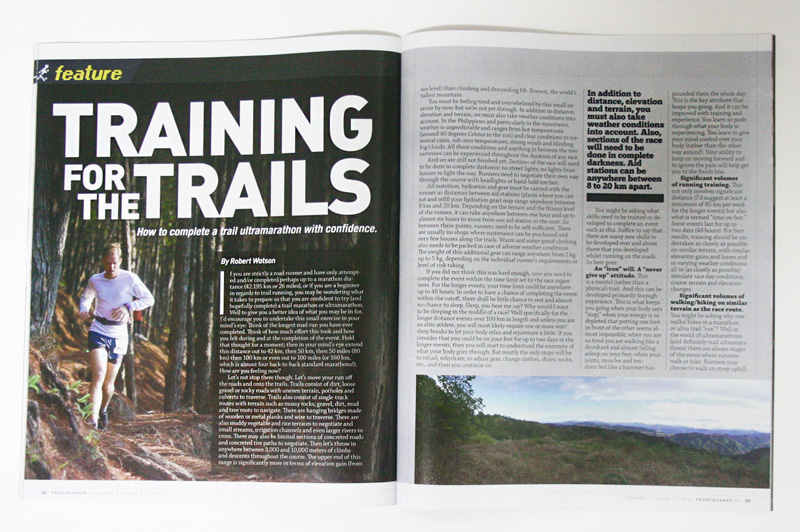
Due to the varying terrain that runners encounter on trails, it is very difficult to adopt an efficient running style or technique such as that which one may be able to develop for running on the roads or on the track. Comparatively (there are exceptions of course), road and track surfaces tend to have minimal variation in terrain besides generally gradual elevation profile changes on hilly routes. Also, surface composition remains relatively unchanged with either concrete or asphalt as the most common road surfaces.
However runners who have been training or racing on trails for some time will recognize that there are many different types of trails ranging from the less technical graded dirt road through to highly technical trails full of rapid elevation changes, roots, rocks, mud, water, sand, gravel, natural steps, etc. For trails it’s important to distinguish between “terrain”, “trail composition” and “trail condition”.
When we refer to terrain we mean the topology of the trail, such as elevation profile changes on a macro level down to the “step by step” changes that occur at the micro level. Trail composition on the other hand refers to the makeup of the trail itself such as soil, rocks, sand, leaves, pine needles, roots, gravel, etc. Trail condition refers to whether the trail is dry, damp, wet or saturated.
When talking about foot placement whilst navigating trails it is important that we consider all three trail attributes. As we move from step to step on a trail the combination of elements present will vary. Hence there is no consistency and each step must be taken as unique from any of those taken previously. Hence the challenge of tackling and conquering trails. As with most things in life, and this also applies to trail running there is only one way to get better. And that’s to do lots of practice.
So how does better foot placement technique allow one to get better at running trails and what techniques lead to faster running on the trails? Well you can become a better and faster trail runner by developing your scanning, planning and foot placement ability.
Before talking about this in more detail some considerations to take into account as a trail runner are:
-
The size of your shoes.
-
Your height.
-
Your strength (particularly your legs and core).
Now why might these three attributes be important when talking about foot placement? Let’s address each of these in turn.
Firstly, the smaller your foot (shoes) then your foot placement options tend to be greater, as it is easier to place a smaller foot into a more ideal position when running than it is with a larger foot. For those runners with bigger feet such as myself (US size 13) then your foot placement options are reduced somewhat due to the larger surface area with which to be able to find the most appropriate point of placement on the trail. This becomes more prevalent the more technical the trail becomes.
Secondly, the taller you are then the higher your center of gravity. This is important as the higher your center of gravity then the less stable you will be on your feet. However, the taller you are then you will also most likely have longer legs which can also improve your options in terms of foot placement as you will tend to have a larger range of motion than a runner with shorter legs. Lower stability with an increase in height also becomes more prevalent, the more technical the trail becomes.
Your leg and core strength will also either improve or decrease your ability and options in terms of foot placement. You will tend to need to take smaller steps if your leg and core strength are poor than you will if you have good leg and core strength. Therefore with less strength, your options tend to be reduced in terms of foot placement as you have a smaller range of motion and hence a smaller available field in terms of your foot placement options.
As a taller runner you will also need to have relatively better core and leg strength than a shorter runner as you will need to be able to manage your higher relative instability.
So what am I saying here? Well on very technical terrain, shorter runners (which usually also means smaller feet) tend to have the advantage whilst on less technical terrain taller runners (all things being equal) tend to have a slight advantage.
So now that we’ve seen how the type of trail you are running on and your runner attributes can affect foot placement let’s talk about some techniques that may help you become better at this activity.
With trail running my general approach to training and racing is to “plan and practice for the best case scenario but be prepared for the worst case outcome”.
Some general guidelines with respect to ideal foot placement:
1. Run light. If at all possible never put your full weight on any one foot in case your foot placement is not ideal and you experience a slip. Not having your full weight on your ground contact foot could avoid a nasty fall as you then have a better ability to recover more quickly by shifting your weight quickly to the other foot.
2. As much as possible your foot should contact the ground directly under your center of gravity. The reason for this is that should your foot placement not be ideal, then this will reduce the potential for slipping, becoming off balance and potentially having an unavoidable fall. Whilst running down steep slopes this will mean you need to lean slightly more forward than you may think is warranted and to shorten your stride.
3. Plan your foot placement a few steps in advance. This is an acquired skill that comes with lots of practice. The more technical the trail and the faster you run then the more difficult this skill will be to perfect. Start your practice on less technical trails and keep the pace slow. As you gain confidence then you can increase the speed and / or the technical difficulty of the trail. There are three components to this as follows:
a. Scan the ground immediately in front of you and out to about three or four meters in front of you. What you are looking for are (as much as possible) flat, non-slip landing zones that will fit your shoe for the next three steps in advance of your current ground contact point. The more technical the terrain the more time this will take and you may only have time to find one or two landing zones in advance of your current ground contact point.
b. Plan your route, body placement and exact foot positioning for the identified landing zones. As much as possible you should try to keep your body (and hence center of gravity) above your foot landing zone on ground contact.
It’s important to recognize that there is no “ideal” foot placement position and sometimes you may only have space in your chosen landing zone to place half your foot (say your heel or the ball of your foot) only. So with less ground contact this also generally increases your chances of slipping or stumbling. Due to limited options some of your chosen landing zones may be even less ideal than this where you may be having to land on wet, slippery rocks or dry pine needles or a host of other less than safe landing zones. This leads on to the next guideline.
4. Control your fear. Some runners tend to “pick” their way along trails as they succumb to their “fear” of slipping and potentially falling. In my experience if you are afraid to fall then you will fall. Have confidence in the training you have undertaken and overcome your fear. You may find you are able to traverse a trail faster and utilize less energy in the process as your running style will “flow” more efficiently than if you are stiff and scared.
5. In contrast to the earlier point, expect that your foot placement will not be ideal and expect and accept that you will slip, slide and trip over regularly. The important thing is that if you expect it to happen then you can always plan to overcome these occurrences without hitting the deck. Sometimes there is no good option in terms of foot placement and your options may be either “bad” or “worse”. In these scenarios you must do the best with what options you have but be prepared to react and recover to an “expected” slip, slide or stumble.
6. Sometimes when you are not able to plan your foot placement in advance you will need to take a “step of faith”. What I mean by this is that you end up taking your next step without knowing at that point where your foot is going to be placed when it lands. This may happen if you loose your footing earlier as you will be focused on regaining your balance at that point and not planning ahead for your next foot placement. This may also happen if you are really moving quickly and your mind and eyes are not able to keep up with the constant scanning and planning process for foot placement. So what I do here is that I tend to take off for a longer step and with a higher bounce. What this effectively does is gives your brain a fraction of a second longer in order to catch up on it’s scanning and planning process as this type of step will take longer to complete. This also assists in maintaining your momentum. What this process allows you to do is to adjust your stride length and hence foot placement “mid stride”. So after you take off your brain notices a possible foot placement position that is shorter than the actual natural landing point based on your takeoff. So you can pull your stride back a little in order to get your foot into the identified placement position whilst in mid air. This may leave your foot strike contact point slightly behind of your center of gravity, and hence this will need to be managed in the next stride to avoid potentially falling forward. Alternatively, if your brain identifies a foot placement position beyond the natural landing point then you will need to extend your stride forward slightly and almost “float” to your newly identified foot position. This may leave your foot strike contact point slightly ahead of your center of gravity that may increase the risk of slipping or sliding so this should always be in the back of your mind.
The better you are able to master the above techniques then the faster and more effortlessly will you be able to navigate trails.
In addition to the techniques outlined above some specific pointers (these are generalities only and some of the following pointers may not hold true in certain circumstances) for expectations on different types of trail composition are as follows.
- Dry pine needles tend to be slippery as the cylindrical shape combined with limited friction between each of the pine needles means they tend to roll under your feet. Damp or wet pine needles tend to be fairly stable under foot. This is because water tends to assist the needles in clumping together which aids in under foot stability.
- Wet roots tend to be very slippery under foot whilst dry roots tend to be fairly “grippy”.
- Dry leaves tend to be more slippery under foot than damp or wet leaves.
- Dry rocks (not covered in moss or algae) tend to be relatively “grippy” under foot whilst most wet rocks tend to be slippery under foot.
- Small gravel on a slope tends to be more slippery and unstable under foot when dry then when damp or wet. Sometimes damp or wet conditions allow gravel to somewhat “stick” together better although this is not always the case.
- MUD is always slippery! The more water infused in the dirt then the more slippery it tends to be.
- Dry sand (like gravel) tends to be unstable under foot whilst wet sand tends to have more grip and more stickiness under foot which aids in under foot stability.
- Compacted (solid) damp or wet type clay soils are generally slippery. When these are dryer they tend to be very “grippy” under foot.
- Loose dry soils tend to be slippery under foot. With some dampness or wetness these types of soils can become more “grippy”.
[/woodmart_text_block][/vc_column][vc_column woodmart_sticky_column=”true” offset=”vc_col-lg-4 vc_col-md-4″ css=”.vc_custom_1494491003828{margin-bottom: 15px !important;}”][woodmart_title size=”extra-large” align=”left” woodmart_css_id=”62722f00695f1″ title=”Mind Your Footing” responsive_spacing=”eyJwYXJhbV90eXBlIjoid29vZG1hcnRfcmVzcG9uc2l2ZV9zcGFjaW5nIiwic2VsZWN0b3JfaWQiOiI2MjcyMmYwMDY5NWYxIiwic2hvcnRjb2RlIjoid29vZG1hcnRfdGl0bGUiLCJkYXRhIjp7InRhYmxldCI6e30sIm1vYmlsZSI6e319fQ==” css=”.vc_custom_1651650311838{margin-bottom: 0px !important;}”][woodmart_text_block text_font_family=”primary” text_font_size=”s” text_font_weight=”600″ text_color=”custom” woodmart_css_id=”627219a33ad89″ parallax_scroll=”no” woodmart_inline=”no” wd_hide_on_desktop=”no” wd_hide_on_tablet_landscape=”no” wd_hide_on_tablet=”no” wd_hide_on_mobile=”no” css=”.vc_custom_1651644844560{margin-bottom: 25px !important;}” text_color_custom=”eyJwYXJhbV90eXBlIjoid29vZG1hcnRfY29sb3JwaWNrZXIiLCJjc3NfYXJncyI6eyJjb2xvciI6WyIud2QtdGV4dC1ibG9jayJdfSwic2VsZWN0b3JfaWQiOiI2MjcyMTlhMzNhZDg5IiwiZGF0YSI6eyJkZXNrdG9wIjoiIzk4OTg5OCJ9fQ==” responsive_spacing=”eyJwYXJhbV90eXBlIjoid29vZG1hcnRfcmVzcG9uc2l2ZV9zcGFjaW5nIiwic2VsZWN0b3JfaWQiOiI2MjcyMTlhMzNhZDg5Iiwic2hvcnRjb2RlIjoid29vZG1hcnRfdGV4dF9ibG9jayIsImRhdGEiOnsidGFibGV0Ijp7fSwibW9iaWxlIjp7fX19″]Run of a Lifetime[/woodmart_text_block][woodmart_text_block woodmart_css_id=”6271f71d1b5f7″ css=”.vc_custom_1651636010620{margin-bottom: 45px !important;}” parallax_scroll=”no” woodmart_inline=”no” wd_hide_on_desktop=”no” wd_hide_on_tablet_landscape=”no” wd_hide_on_tablet=”no” wd_hide_on_mobile=”no” responsive_spacing=”eyJwYXJhbV90eXBlIjoid29vZG1hcnRfcmVzcG9uc2l2ZV9zcGFjaW5nIiwic2VsZWN0b3JfaWQiOiI2MjcxZjcxZDFiNWY3Iiwic2hvcnRjb2RlIjoid29vZG1hcnRfdGV4dF9ibG9jayIsImRhdGEiOnsidGFibGV0Ijp7fSwibW9iaWxlIjp7fX19″]Front Runner Magazine[/woodmart_text_block][vc_row_inner equal_height=”yes” content_placement=”middle”][vc_column_inner width=”5/12″ css=”.vc_custom_1481476631480{margin-bottom: 20px !important;}”][/vc_column_inner][vc_column_inner width=”7/12″ css=”.vc_custom_1481476640791{margin-bottom: 20px !important;}”]
[/vc_column_inner][/vc_row_inner][/vc_column][/vc_row]